
Artwork Guidelines
Clean, Crisp Prints
We pride ourselves on getting the best out of every print and that starts with the artwork. Scroll down through our brief guide on how to optimize your files for perfect reproductions of your design.

1. File Type & Specs
In order to provide the best file types for printing, we highly recommend using professional software (like Adobe) that can provide vectorized graphics or high resolution images. Here’s a quick breakdown of what we’re looking for:
Best Method
Vector Art Files
File types
ai, .psd, .eps, .pdf (layered)
Programs
Adobe Illustrator, Adobe Photoshop, Affinity Designer, Silhouette Studio, Corell Draw and others.
-
CMYK recommended (RGB will be converted)
All text converted to outlines or provide the font file
Avoid the use of clipping masks, if at all possible
300 dpi (resolution) or higher
Artwork dimensions created and saved at actual print size in inches
Save as layered PDF, .AI, or .PSD (also acceptable: .EPS)
Raster/Bitmaps Art Files
File Types
.pdf, .png, .tiff, .psd, .eps
Programs
Adobe Photoshop, Adobe Illustrator, Adobe Fresco, Affinity Photo and others.
-
Make sure your design is at least the size you want printed or larger -- we can always size down, but sizing up can be tricky in some cases
CMYK recommended (RGB will be converted)
300 dpi (resolution) minimum or higher required
Use a transparent background for free-floating art
Save as PDF (also acceptable: .psd, .tiff, .eps, .png)
Print ready files with Canva
Canva designs are accepted on a case-by-case basis, depending on the level of complexity and detail. You will need to have a paid membership. The free version will not export correct formatting.
-
Click “Create a design” at the top right hand corner of the webpage.
Select “T-shirt” (14 x 18) from the drop down list.
Make sure your design is at least the size you want printed or larger -- we can always size down, but sizing up can be tricky in some cases
After you have completed your design, click “Share”, and then “download” from the dropdown list.
For file type select SVG, PDF, or PNG
For PNG - toggle file size all the way over, and check “transparent background”
Then click “Download”
NOTE: Word docs, Google docs, Pages docs, Powerpoint files, Keynote files, and screenshots are not acceptable for printing. .JPEGs are also accepted only on a case by case basis.
2. Create at Desired Print Size
We print artwork at the size it is provided. It’s highly recommended to work in inches when creating your artwork and not pixels, picas, or other units of measurement. Set your canvas dimensions to one of our max print dimensions based on what you’re printing on:
Front or Back of Garment
12”x18”
Pocket & Sleeves
3.5”x15”
Hats
4”x2.5”
Custom Tags
4”x3”
3. Convert fonts to shapes
All text must be converted to outlines or shapes; otherwise, all fonts used in the artwork must be provided as we will NOT be able obtain licensed or purchased fonts for you. Simply follow this guide for these graphic design programs or search for a guide on your preferred application:
Adobe Illustrator
Convert to outline
Select all text > TYPE > CREATE OUTLINES
Adobe Photoshop
Rasterize type
Select each text layer > LAYER > RASTERIZE
Corel Draw
Convert to curves
Select all text layers > ARRANGE > CONVERT TO CURVES
4. Embed Linked Images
Often overlooked when creating artwork is embedding images within your vector files. If you do not embed linked images, the files will appear missing from the artwork and may be overlooked in the proofing process. Simply copying and pasting into the program does NOT mean it is automatically embedded into the file. Sponsor logos, hand drawn artwork, and photos are often items that get missed.
Each program is a little different, but here’s a quick example of where to find it in Adobe Illustrator:

STEP 1
Select image and locate embed option in “Quick Actions” or “Links” tab menu.
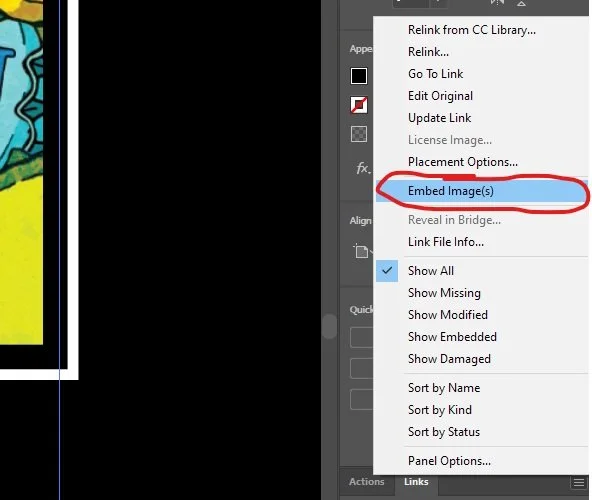
STEP 2
Either select Embed it in “Quick Actions” or select “Links” tab menu and select Embed Image(s).
5. Check Line Weights
When line weights or letters are too small and thin, it will often get lost when burning the artwork onto a screen to make the printable stencil. This means the tiny details will never make it onto your garment. Usual culprits are distressed textures, thin lines and type, and halftones. You may need to add strokes around parts of your design to thicken some areas for print.
Lines must be a minimum of 1pt*!
Make sure free-floating lines and gaps 1pt (0.35 mm)* minimum; otherwise, the artwork will not print correctly and have undesired results. Artwork will be printed as is or we will request a rework of the artwork to make it printable.
*for white and light colored inks with a higher viscosity, we may recommend a thicker line weight